Wednesday, September 19, 2018

A New Home

To all the subscribers and visitors:

THANK YOU for your continued support and encouragement which keeps me going to add more and more to Wrightsville Port and thrive to make it a truly enjoyable little model train layout. I know that there hasn't been any update in this blog for over 20 months and I apologize for that. What happened is that I have taken on other miniature projects in the mean time that kept me distracted from completing Wrightsville Port. However, I am back with the layout now and there are some exciting new developments that will be coming in next few months.

I am however consolidating all content management efforts to maximize time to do the actual model making work, hence going forward even items that are related to Wrightsville Port will be maintained in my Trains and Dioramas blog (link below). Most likely, there will not be any further post on this blog, so if you are a subscriber or visiting this blog, please feel free to follow my new consolidated blog which will not only include all the activities about Wrightsville Port, but a lot of other miniature projects as well. You can find quite a few of them if you visit right now.

Here are the places to find my work and a way to stay connected:

Trains and Dioramas Blog

I will continue to add Wrightsville Port and other miniature project related items here regularly. Please subscribe. The Website also contains video tutorials and other contents which will be constantly updated. Feel free to look around and stay engaged.

YouTube Channel

A variety of video content starting from How-to Videos/Instructions, Layout Tours and even Prototype Railroad and Travel related content - all focusing on Railroading or Miniatures. Please Subscribe.

In addition, you can stay connected via Facebook or Instagram as well by liking and following.

Well, thank you again for all your support and encouragement, hope to see you on the other side soon.

Happy Railroading,
Kaustav and Mouli

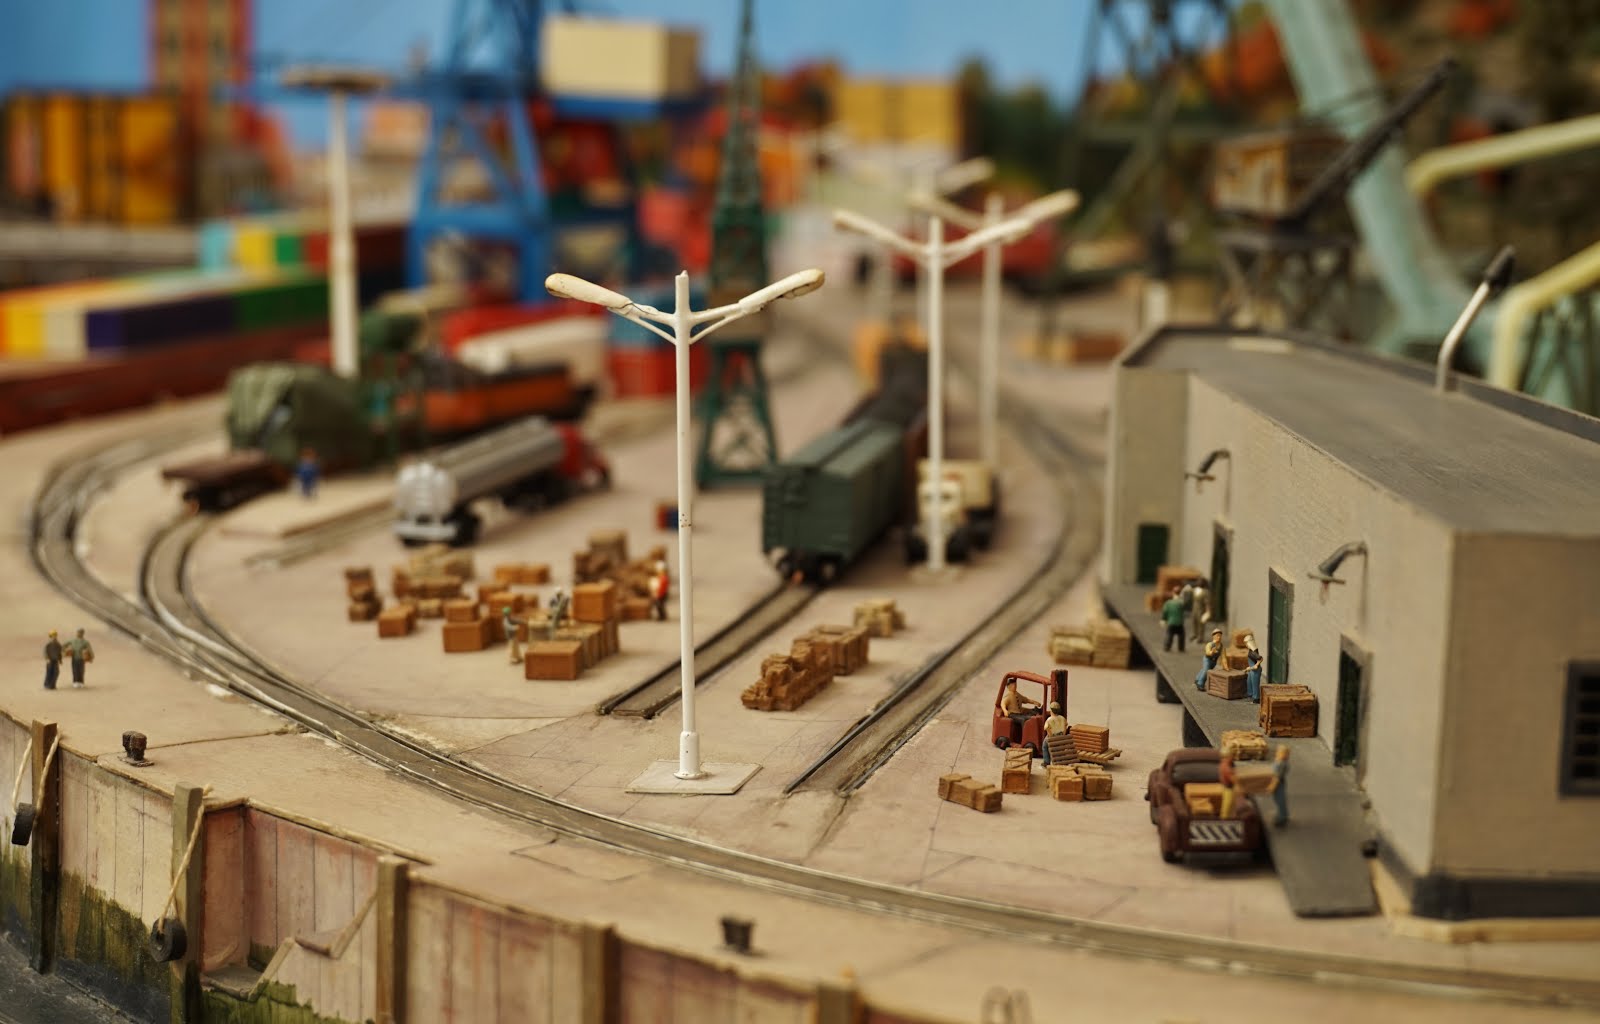
P.S. Before we go, Wrightsville Port moved to its 6th home in 2 cities that are 1000 miles apart in a little more than 7+ years of its existence! Here is the album that shows the latest photos of the layout:


Wrightsville Port - N Scale Layout

Friday, January 6, 2017

Finally... the oil facility is complete.

Happy New Year!

After a little pause from Model Railroading (which is never surprising nowadays), I acme back to complete the oil facility. All major components were completed a few months back, the only thing pending were the pontoon rafts to separate the ship from the port quay wall, and then completing the mooring to tie the ship to the dock.

So here are the little pontoon rafts - nothing special really. dimensions are 30 X 25 X 8 in millimeters, plus the tires. Made of styrene, and bitts are my customary toothpicks. I think I am getting the hang of the air brush thingy!


Once these are built, the only thing remaining was to tie them up with a chain and sandwich them between the ship and the port wall. My wife donated me with one of her cheap chains, so I painted it and used them to tie these up to the bitts. Once done, I completed the mooring of the ship with 4 lines which I think is sufficient for a ship of this size.

So here are the final photographs:


Here is a helicopter view of the facility that clearly shows the placement of the pontoon rafts and the whole facility.


Now, here I would like to take the opportunity to thank my dear friend John Milford for his invaluable guidance on everything related to ships, ports and all the nitty-gritty of how to model a realistic port scene. It started with this very model - Sirius, the Oil Tanker, and then it continued throughout the other aspects of this project for lat 8 years- thank you John!

Thursday, October 6, 2016

Port office, Junk Yard and Rooftops

Well, the next endeavor was to complete a project that seemed deceptively small and simple in the beginning - completing the port office and a small junk yard.

For the office building, I went back to my roots of using paper - the brick texture is a scalescenes texture printed directly on a 50 GSM water color paper. Then that sheet was pasted on a 100 GSM water color paper to make a solid brick texture board suitable for N scale.

Windows and doors are Grandt Line products, the corrugated shed is made of styrene corrugated sheets.


Now to the next step - it is very unusual to see a port with railroad not to have a junk yard. However, given how small this layout is, there is not enough space to make a proper junk yard, so I decided to use the real estate available at the base of the grain conveyor tower to make a old junk yard.

Given this is a 1960s layout, I also took the opportunity to bring the 'ghosts of steam' in my theme - in the early days of N scale I purchased a Bachmann set that had a tiny 0-6-0 - lovely little engine that never worked properly. Some point since then I was irritated enough to disassemble the whole engine trying to fix it - never succeeded. The engine remained disassembled and in reality in the status of scrap ever since in a little box - the only thing that was intact is the tender. When I decided to build the junk yard, I just took out those parts, weathered them heavily to create the main contents of the junk yard. In addition, I threw in some more heavily weathered stuff whatever I could find - an odd wheel, some broken corrugated sheets and some literal junk. Added some small amount of tall grass too so that it looks more realistic.


Finally, I also managed to paint and add some rooftop gears in some of the buildings - these are all from a Corner Stone series - first spray painted, and then I used dry brushing to highlight the vents


Monday, September 19, 2016

Flanges and valves added to the loading arm

Here is one more pics with some more detailing to the loading arm:


I have also added the mooring on the ship so it looks much more realistic now.

More coming soon..

Oil Pier - First attempt at airbrushing

Well, it definitely seems like the old days again! Fortunately I have more time for making models, and also upgraded my arsenal with some very important tools that were long overdue - a Dremel rotary tool and an airbrush are the top two recent acquisitions.

So when I started working on the oil pier, the focus was more on using the tolls as well as building the model! Hence there is not going to be a step by step construction post for this one because we simply didn't have the patience to take photos after every step - we were two excited to build it and then take it straight to the paint booth... I mean the cardboard carton that acted as the paint booth!

First, here is the in progress photo of the facilities of the oil pier. Given how small this pier is - there is basically nothing much in terms of operations. Small ships/barges unload oil that is stored in the 4 relatively small oil storage tanks. Then the the tanker cars are loaded and the oil is shipped to the local businesses. The oil storage tanks and the ships were built long ago, so I started with the tanker car loading platform and the small pump-house-cum-control room.


The material of choice however has changed considerably - except the base which is cardboard, everything else is either styrene or plastic. As per my trademark 'scrap-building', I have used some leftover parts from the ME trestle kit, as well as the sprue of the same kit used to make the piping.

My initial thought was to simply model a couple of hose pipes connected to the ship to simulate unloading, much like below.


However, when I started finding some prototype photos, I found that this is not really how the oil unloading happens - not even in the smallest of the ports. What they use is something like this, called the loading arms.


So I found a few drawings online, and decided on this one - simple enough for my tiny oil pier, but keeps is real and prototypical.


The material I used for the piping is also something very new to me - aluminium tubes. Though I have used them before, I have just cut them in straight sections. Given I did not have the L pipe joints in N scale, I had to use my new Dremel rotary tool to cut, bend and shape the pipes - sorry, no progress photos from here onward since we were building and discovering quite a few things at the same time, we didn't really think of taking progress shots.

So here is the final result - all weathered to match the tone of the rest of the layout - the only thing pending now is completing the mooring on the ship, and then this section of the layout is done.


Monday, August 29, 2016

Motorized Lighthouse

First project in the new apartment, again something that is long pending.

Though I made the lighthouse nearly 5 years back (Gosh! time flies!), I never got around to motorize it. While re-assembling the layout in the new apartment, I decided to start with this one since I already have all the materials needed to motorize the already built structure - it's just about attaching the lens housing (which was also made nearly 4 years back) to a slow motion motor.

The first step was to measure the space and clearance for the motor:


Then I'd cut a Masonite circular disk matching the inner diameter of the base of the lighthouse


The central hole was made to fit the motor bolt thread of the motor housing


The motor was then fixed to the board,


And then test fitted at the bottom of the lighthouse to check for clearance etc.


If you see the original construction details of the lighthouse (and many pictures thereafter), you would notice that the beacon housing already had a light installed. I just tested it's position and made sure everything is in it's place


Next step was to attach a shaft to the motor. Now this is where I again switched to 'scrap-building' mode. I didn't have a hollow shaft of suitable diameter with me - neither styrene, nor metal. So I went scrap hunting that can be made into a suitable hollow shaft, and I found a non-working pen. This was a gift from Brooklyn Locomotive Works, so I thought what could be a better place to utilize this than on an N scale Layout!

All the internal mechanism of the pen was removed - the tip side of the pen meshed nicely with the motor shaft, so I just secured it by drilling a through hole on the pen and securing it to the motor shaft using a pin (which was actually a part of a paper clip):


If you follow my work closely you would notice that one of my major focuses is always easier maintenance, because in my experience, things can go wrong at any time. So I decided not to permanently attach the lens housing to the shaft. So I created a removable section that tightly fits to the upper portion of the pen, but can be removed if required.


Now, if you are wondering how I found that lens - it is actually a contact lens packet! Some of the contact lens packaging have a perfect lens for model making - perfectly shaped, made of tough plastic and has very short focal length which is perfect for a lighthouse animation.

Here is the final shaft assembly with the lens:


And here is how the assembly looks when you 'cover' the shaft with the lighthouse structure. The light bulb hangs from the ceiling of the beacon housing and sit along the axis of the rotating, hollow lens housing.


And here is the lighthouse totally assembled:


Final test before installing on the layout


And that's how it looks when installed:


Here is a very short video to show it in action - Technically this is a 'fixed and flash' lighthouse with no eclipse:


All the photos and videos are with my phone, hoping to get a better composed video soon - may be after I finish some more work on the layout. :)

Tuesday, August 16, 2016

5th home for Wrightsville Port

When I'd set out to build this Model Railroad back in 2010, very little I knew about the road ahead of me. Well, you might say that you never really know the road ahead, but you have a general idea most of the time, you tend to follow a 'track' (Pun intended!) - you know where you are going, you know the 'stations' to come and you know the timetable. For me, it has always been more of a free flowing road trip for last 5 years - I worked in 4 different companies, all in very demanding jobs, moved to 5 different apartments and 3 different cities. Now, I had no idea back in 2010 that stability will be so hard to get - especially when we bought our own apartment back in Calcutta, but life had different things in store for me than what I'd thought, and things changed. Just to make it clear, it changed for better.

That's where I see the biggest success of Wrightsville Port - It stayed with me for last 6 years and never been a headache during all these movements! It was built as a portable layout, yes, but I never thought that it would travel to so many places (and I can assure you, it's not done yet!). Every new move also presents me with the opportunity of fixing and improving a few things. The layout is generally made clear of all buildings, ships and most of the details - they are removed, packed and shipped separately; only the permanently glued details and the main lights remain on the layout. This gives me the opportunity to work on the wiring when the layout is taken down (it takes 2 people to take down the baseboard - so far it has always been Mouli and I), so we did it this time too. However, this time I also took the opportunity to build a brand new acrylic dust cover for the layout. A dust cover was long over due, and 6 years of dust already made some damage despite my best efforts to clean the layout. I bought a sheet of 2mm clear acrylic, cut them in strips of 18" width and used a heat gun to shape according to the unique contour of the layout. The top is made of PVC foam in two halves. All in all, it takes about 60-90 seconds to remove them, and about 30 seconds more to assemble  - pretty acceptable before and after an operating session.

So, here is Wrightsville Port, happily settled in it's 5th home! This time even the dimension of the room is just made for the layout - 9' X 8' - gives snug fit to the layout and the staging-cum-bookshelf, with enough room for me to stand and operate.


This experience of working with acrylic sheets and PVC foam board is going to be important though, because I think I found my ideal material for modern benchwork that is far easy to work with and has many benefits over plywood - so the next project is definitely going to have these two as the base construction material - however, more on that later.

Monday, February 8, 2016

Some more detailing of the port

Well, despite having very less time for modeling, it seems I have renewed energy to see this project through somehow. Though nothing major, I added some more odd details around the layout, one of the major ones being installing over 20 bitts around the quay. Previously, I used various methods to make bitts, but this time I took to an easier path that can make really strong bitts - strong enough to take mooring line of size 8 threads anyway!

Couple of important aspect of my method is that firstly, my port surfaces are all cardboard. Secondly, underneath that cardboard throughout the edge of the port it's foam.

What I did first was painted a bunch of wooden toothpick burnt sienna. Notice those curving on top of the toothpicks and the big crevice right below the top 'blob' - that makes them natural selection for bitts.


I then drilled pair of holes in failry equal distanc at the edge of the port using #61 drill


I had then taken the pair of painted toothpicks and marked the required length to which they need to be trimmed to meet the required height.


Once the toothpicks are cut to size, I just pushed them through the holes that I just drilled


And finally when both are pushed all the way through, I got a pair of bitts


Once all the bitts are 'nailed' down, I did half the mooring for the largest ship on my layout Betelgeuse - just the bow line and one of the springers. The Stern line and the other springer will be moored in due time. The water level is pretty 'low' and looks pretty 'solid' to ensure that the stern of the ship doesn't start drifting towards the upcoming boat yard. After all, there hasn't been any serious accidnt in Wrightsville Port for last 5+ years though none of the boats had mooring on them all this while, so it is, truly, 'cosmetic'


Monday, February 1, 2016

Trying out my new camera!

This not really is an update on the layout as much it is about my new camera - Sony Nex 3 Mirror-less. With my astrophotography bug forcing me to do modifications in my Canon 1100D and making it virtually non-usable for anything else other than astrophotography, and my aging Fuji S2000HD, I desperately needed a reasonably priced option that caters to all my photography needs, including light astro-photography - hence Nex 3. Old enough to be reasonably priced, small enough for travel and casual photography, interchangeable lens to get the benefits of a DSLR - all in all a good deal for me.

Now enough about the camera intro - let's see what it can do in terms of model photography.

Here are some shots - taken real quick using the smart features of the camera and some with full manual settings. I might need a macro lens, but as a start, this camera definitely have the potential to take good miniature photos:


And then there was time to test the videos. Now this came to me as a complete surprise, but this camera's video features are better than many dedicated video cameras! Video is synched with the still photography mode (If you are taking still photos using smart setting, the same settings will apply to your videos, if you are using manual, then you can set your video settings as well), giving you a wide range of options to adjust aperture, ISO, gain and other setting. So here is a video of the layout taken with the same camera.


Now something about the sound - this is a Train Tech Sound Capsule installed as a over-sized load in the depressed flat car. This is a truly plug and play - battery operated and motion sensing. The sound sequence is pre-programmed, so you cannot really make it sound the way you want, but with a little practice and variation of speed, you can achieve decent sound simulation. This is a very good way to add sound to any DC layout - no wiring, expensive DC sound units or sound cars. For HO/OO this thing is very easy to conceal in any carriage (it actually is meant for OO scale), you have to be creative to make it fit in a N scale car - easiest way I found is to use it on top of a flat car as you can see in the video.